Smart under cabinet kitchen lighting: a small upgrade with big impact
Smart under cabinet kitchen lighting is one of the highest-ROI lighting upgrades you can make. It combines precise task illumination, softer ambient light and smart control in a way that makes everyday cooking feel calmer, safer and more premium without a full renovation.

Why smart under cabinet kitchen lighting is the highest ROI upgrade
Smart under cabinet kitchen lighting changes how a worktop feels at night. When the main ceiling lighting is harsh or dim, a continuous under-counter glow gives you task light exactly where knives, boards and pans actually live. The result is a kitchen that feels calmer, safer and more expensive than its materials suggest.
In most kitchens the first smart light should not be a ceiling bulb but a row of cabinet lights that run the full length of the cabinets. A well planned smart under cabinet layout removes shadows from chopping boards, keeps the sink bright and lets you leave the rest of the room in a softer white background. That balance between focused LED task light and gentle ambient lighting is what makes the space feel professionally designed rather than improvised.
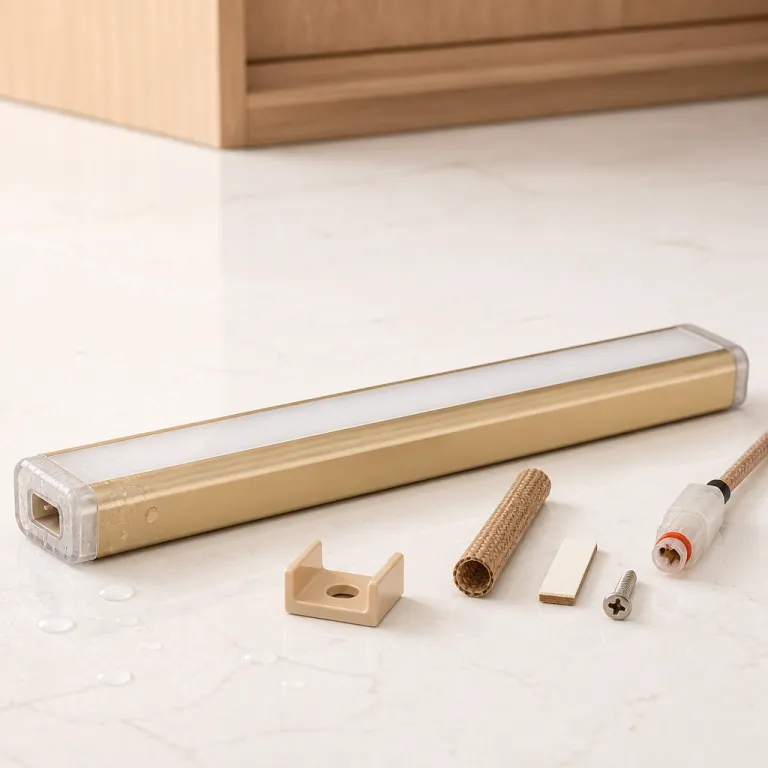
From a cost perspective, the price-to-performance ratio is unusually strong for this category. For roughly €80–150 in parts, a robust smart LED lighting kit can outlast several cheap strips that fail early under steam and grease. Independent lab tests routinely show quality LED modules maintaining 70% of their initial output after tens of thousands of hours, while low-cost, uncooled tape often degrades far sooner under heat and moisture. You pay once for proper cabinet lighting hardware, instead of paying twice for a bargain kit that peels off in chunks after one humid summer.
The other reason this upgrade matters is safety and comfort during real kitchen routines. When you come in early on a dark June morning, a low-level adjustable white glow under the cabinets guides you without waking the whole household. Late at night, dimmable light bars under the counter keep the path to the fridge visible while the main kitchen lighting circuit stays off.
Smart control is the final piece that makes this feel like a genuine step up rather than a gimmick. With a good motion sensor and a simple remote control on the wall, you can automate the routine of turning lights on and off without shouting at a voice assistant. Voice control still has its place, but wet hands and noisy extractors mean physical control remains essential in a real kitchen.
How kitchens quietly destroy cheap LED strips in under two years
Most complaints about smart under cabinet kitchen lighting start the same way. The strip looked great on day one, then steam from the kettle and splashes from the sink slowly attacked the adhesive and the exposed connectors. By the time you notice the sagging LED strip, grease has already crept into the joints and dimmed sections of light.
Three forces do most of the damage in a busy kitchen environment. First, steam and heat soften the glue on budget under cabinet strips, especially above 1.5 m of continuous countertop where the oven and hob live. Second, water splashes and cleaning sprays work their way into unprotected strip ends, corroding the copper pads and causing flicker or complete failure of individual cabinet lights.
The third enemy is heat build-up from both the appliances and the strip itself. Long runs of 12 V smart LED tape driven hard can run hot, especially when stuck directly to wood without any aluminium channel to act as a heatsink. Thermal imaging tests on bare tape versus tape in metal profiles consistently show lower operating temperatures and slower lumen depreciation when the strip is mounted in a proper channel. Over time that heat discolours the white cabinet underside, bakes the adhesive and shortens the lifespan of the LEDs and any integrated sensor electronics.
To resist this, you want IP65 silicone-jacketed strips rather than bare PCB tape for your smart under-cabinet install. The silicone sheath protects the LED and the solder joints from splashes while still allowing good light output and even colour rendering. IP ratings are defined in IEC 60529, and IP65 specifically indicates protection against low-pressure water jets from any direction, which is ideal for the mix of steam and cleaning sprays around sinks and hobs. For runs longer than about 2 m, a 24 V strip keeps voltage drop under control so the colour and brightness stay consistent from one end of the kitchen to the other.
If you care about how food looks, aim for 90+ CRI and a stable adjustable white range between about 2700 K and 4000 K. That specification matters more than fancy colour-changing party modes when you are judging whether meat is cooked or herbs are fresh. For a deeper dive into how strip quality and colour science affect real world results, a technical guide on smart LED strip lights and colour science is worth reading before you buy.
The mounting pattern that actually survives steam, splashes and teenagers
The biggest difference between a temporary and a durable smart under cabinet kitchen lighting install is the mounting method. Sticking an LED strip directly to the underside of a cabinet with the factory tape is fast, but it leaves the strip exposed to knocks, cleaning cloths and curious fingers. A better approach uses aluminium channels with snap-on diffusers to protect the strip and smooth the light.
These channels act as both armour and heatsink for your smart LED tape. The metal spreads heat along the run, keeping the LEDs cooler and extending their life while the diffuser hides individual diodes and eliminates dotted reflections on glossy worktops. When you look across the kitchen, you see a continuous bar of light rather than a row of bright points under each cabinet.
Placement inside the channel also matters for how the light feels. Mount the channel toward the front edge of the cabinet underside so the beam washes the worktop rather than the backsplash, which keeps shadows off your hands and knives. If your cabinets are ultra-thin or have a decorative lip, choose low-profile light bars or channels that fit neatly without protruding into view.
Teenagers and younger children add another design constraint that many guides ignore. Any visible wire at countertop level will eventually be pulled, tugged or used as a makeshift hook for headphones and bags. To pass the teenager test, run every cable either above about 1.8 m or fully inside the cabinet structure, with only the clean cabinet lighting channel visible from below.
For corners and gaps, use proper clip-on connectors or soldered joints rather than bending the strip sharply. Sharp bends stress the LED and can crack the copper traces, leading to intermittent failures that are hard to diagnose. If you want more creative ideas for routing and hiding flexible lighting, inspiration pieces on creative ways to hang lights can translate surprisingly well to under-counter layouts.
Wiring, power and control: from wall socket to reliable daily routine
A clean smart under cabinet kitchen lighting install starts with a clear wiring path. Instead of dangling power bricks near the backsplash, drill a discreet 6 mm hole in the back corner of each cabinet run and feed the strip lead through. From there, you can route all low-voltage cables inside the cabinets and hide the main power supply in a dead corner cupboard.
Using a single 24 V driver sized for the total LED load keeps things simple and reduces the number of failure points. That driver can plug into a standard socket controlled by a smart plug or an in-wall smart switch, which becomes the master power for the entire under cabinet system. This approach lets you cut power completely if a strip or sensor misbehaves, without hunting for tiny inline switches behind appliances.
Control is where many first-time smart buyers over-rely on voice assistants. In a real kitchen, your hands are often wet, greasy or full of pans, so shouting at Alexa or Google every time you want more light quickly becomes annoying. A better pattern combines a motion sensor inside a frequently used cabinet with a physical remote control or wall-mounted scene controller near the main entrance.
The motion sensor can handle automatic on and off during normal cooking sessions, triggering the cabinet lights whenever you open the door for plates or spices. Timeouts of 5 to 10 minutes work well, keeping the light on while you move around but turning it off if you leave the kitchen. The remote control then gives you quick access to brightness presets, adjustable white scenes and any colour-changing modes you actually use.
If you already run a broader smart lighting system, choose under cabinet gear that is compatible with your ecosystem. Many smart LED strips and light bars now work with Alexa, Google Assistant and Apple Home, but check whether they are truly compatible with Alexa and Google for local control rather than only via cloud. For a sense of how app, remote and voice control can coexist in one product, a detailed review of a smart LED ceiling light with Wi‑Fi and remote offers useful parallels.
Safety note: if you are not familiar with mains wiring, limit your work to low-voltage connections and use pre-wired drivers and smart plugs. Any changes to fixed 230 V or 120 V circuits should be carried out by a qualified electrician and in accordance with local electrical codes.
Choosing the right smart strips, kits and ecosystems for your kitchen
When you shop for smart under cabinet kitchen lighting, ignore most marketing claims and focus on a few hard specs. Look for LED strips or light bars with at least 90 CRI, a stable adjustable white range and a clear statement of whether they are tunable white only or full colour-changing RGB or RGBW. In a working kitchen, tunable white is used daily while saturated colour is an occasional accent for parties or late-night snacks.
Smart LED strips sold as a complete lighting kit can be tempting because they bundle a power supply, controller and remote control at an attractive price. The trade-off is that some of these kits lock you into a closed app or a single cloud service that may not integrate cleanly with your existing smart home. Before you commit, check whether the kit works with Alexa and whether it also supports Alexa and Google ecosystems through Matter, Zigbee or local Wi‑Fi control.
For many buyers, a modular approach using separate high-quality strips, aluminium channels and a third-party controller offers more flexibility. You can pair IP65-rated tape with ultra-thin channels that suit your cabinet profile, then add a controller that is compatible with Alexa, Google and Apple Home for future-proofing. This way, if a controller brand disappears from Amazon or stops updating its app, you can swap that piece without ripping out the entire cabinet lighting run.
Colour temperature defaults also deserve attention because they shape how the kitchen feels at different times of day. A baseline around 3500 K gives a neutral yet warm white that flatters both food and faces, while cooler settings around 4000 K can be reserved for detailed prep work. Many Cync Reveal and Reveal-style smart products emphasise high CRI and pleasant white tones, which is more valuable over time than extreme brightness numbers on a box.
Finally, be honest about your budget and expectations before you start drilling cabinets. A solid smart under-cabinet install with quality cabinet lights, a reliable motion sensor and a robust controller will usually land between €80 and €150 in parts. A €30 bundle might seem like a bargain, but when the adhesive fails and the colour shifts after a year of steam and splashes, you will pay again in both money and time to redo the work.
FAQ
What is the best color temperature for under cabinet kitchen lighting
For most kitchens, a default around 3500 K offers a good balance between warmth and clarity. It keeps food looking natural while still providing enough contrast for reading recipes and chopping safely. You can then use cooler or warmer presets for specific tasks or evening ambience.
Do I need waterproof LED strips for under cabinet lighting
Fully waterproof strips are not always necessary, but IP65 silicone-jacketed strips are strongly recommended near sinks, hobs and kettles. The silicone sheath protects against splashes, steam and cleaning sprays that quickly degrade bare PCB tape. This extra protection usually adds only a small cost compared with replacing failed strips later.
Is voice control enough for kitchen under cabinet lights
Voice control is convenient for occasional adjustments, but it should not be your only method. Wet or greasy hands, extractor fan noise and family conversations all make voice commands less reliable in a busy kitchen. A combination of motion sensors and physical remotes or wall buttons gives you faster, more dependable control.
Can I retrofit smart under cabinet lighting without rewiring my kitchen
In many cases you can add smart under cabinet lighting using existing sockets and minimal drilling. A single 24 V driver can plug into a standard outlet, with low-voltage cables routed through small holes between cabinets. Smart plugs or in-wall switches then provide automation without touching the main electrical circuits.
How much should I budget for a durable smart under cabinet setup
A realistic budget for quality components is usually between €80 and €150 for an average-sized kitchen. That covers IP65 strips or bars, aluminium channels with diffusers, a reliable driver, a controller and at least one motion sensor or remote. Spending less often means compromising on durability, colour quality or integration with your existing smart home.