Why most TV backlight smart strip installs fail long before the LEDs do
Smart LED light strips behind a TV promise cinema-style bias lighting with almost no effort. In practice, many TV backlight smart strip installations fail because the tape cooks, peels, or flickers long before the LED chips actually wear out. If you want your backlight to last, you must treat the setup as a complete system involving heat, adhesive, power, and the screen itself.
When people complain that their LED lights died after a few months, the root cause is usually the way the flexible strip was mounted on the TV chassis rather than a bad batch of LEDs. A typical TV backlight install involves sticking a bendy LED tape directly to warm plastic, forcing it sharply around corners, and then running it at full brightness during every viewing session. That combination punishes the LED segments, accelerates adhesive failure, and ruins the viewing experience you paid for.
The goal of bias lighting is simple: you place a soft halo of light behind the screen to reduce eye strain and improve perceived contrast in a dark room. Done correctly, smart LED strips create a neutral frame of illumination that makes the screen pop without drawing attention to the hardware. Done badly, the same LED strips create hot spots, mismatched color temperature, and a distracting glow that makes every movie night feel like a product demo gone wrong.
The corner problem and how to route strips without killing them
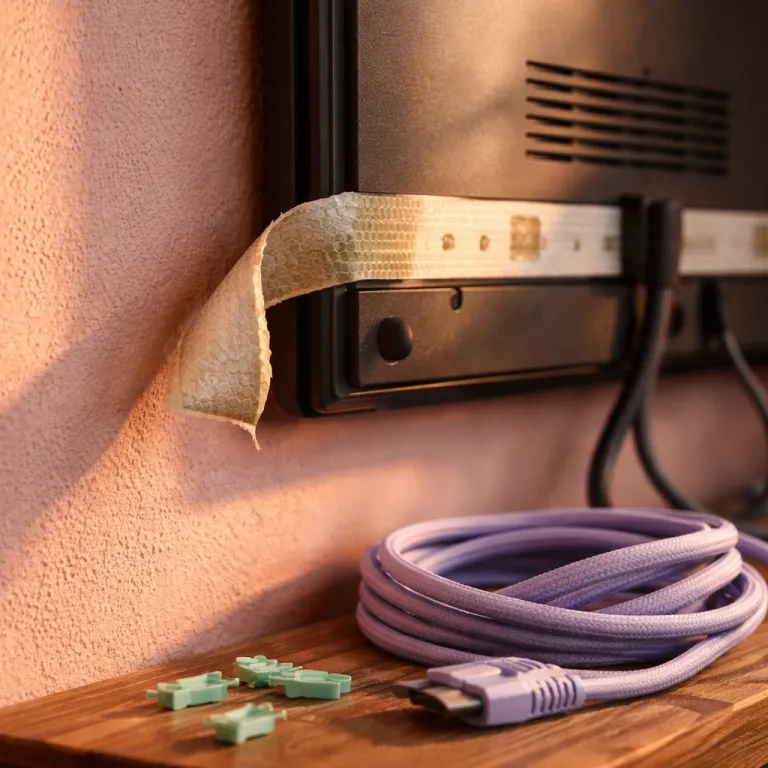
The first silent killer in any TV backlight smart strip install is the corner problem. Most flexible LED strips are designed to bend gently along their length, but they are not meant to fold sharply at ninety degrees around the TV frame. When you crease a light strip at a corner, you stress the copper traces and solder joints, which eventually crack and leave sections of the strip permanently dark.
The correct step is to plan your route before installing LED strips, then use either L-shaped corner connectors or small stress-relief loops instead of hard folds. A stress-relief loop means you let the LED strip run a few centimetres away from the screen, curve in a smooth arc, then return to the TV back, which keeps the internal conductors intact. If you need to shorten or adapt strip lights, follow a detailed guide on how to safely cut and reconnect an LED strip, such as a dedicated tutorial on cutting LED light strips for a smart lighting setup.
On larger screens, especially over 55 inches, you will often run more than one length of LED lights around the perimeter. In that case, use proper connectors rated for the current, and avoid daisy-chaining more than the manufacturer recommends, because each extra light strip increases voltage drop and makes the far end dimmer. A careful TV backlight install will keep the LED strips evenly spaced from the edge of the screen, which preserves uniform backlighting and prevents bright corners that distract from the viewing experience.
Heat, adhesive, and why your strip falls off after a few binge sessions
Heat is the second big reason a TV backlight smart strip install fails long before the smart lighting hardware reaches its rated lifespan. Modern flat screens run warm along the top edge and near the power supply area, and an LED light strip pressed directly against those zones bakes slowly every evening. Over time, that heat hardens the adhesive, discolors the strip, and makes individual LED lights drift in color.
The fix is simple but rarely mentioned in quick install guides: leave a one to two centimetre air gap between the strip and the TV chassis using thin foam spacers or silicone channels. That small distance lets air circulate, keeps the LED strips cooler, and significantly extends the duration before any backlighting failure appears. It also helps the adhesive because it is no longer acting as both glue and thermal pad, which is a role that cheap tape on strip lights was never designed to play.
Adhesive failure is almost guaranteed if you stick an LED strip directly to dusty, textured plastic without cleaning. For a robust TV backlight smart strip install, wipe the screen back with isopropyl alcohol, let it dry, then either apply a 3M VHB primer or use clip-on silicone mounts designed for light strips. If you enjoy creative mounting ideas for other LEDs in your room, a guide to hanging fairy lights for a magical atmosphere shows how thoughtful routing and support can transform both reliability and ambiance.
Power, brightness, and choosing the right strip for a modern TV
Power supply mistakes quietly ruin more TV backlight smart strip install projects than any other single factor. Every LED strip consumes a specific number of watts per metre, and chaining extra strips beyond the power brick rating causes the far end to flicker, then fail completely. Before installing LED strips behind your screen, calculate the total wattage and ensure the adapter has at least twenty percent headroom for stable work.
Brightness is the next trap: running strip lights at one hundred percent during intense screen sync sessions looks impressive for a week, then steadily increases heat in the LEDs. For bias lighting behind a TV, capping brightness at around seventy percent is a practical compromise that reduces thermal stress while still delivering a rich viewing experience in a dark room. Many smart light apps let you set a maximum output, so use the app or remote control to lock in a comfortable level and resist the temptation to push everything to maximum.
For a new TV backlight smart strip install today, I recommend RGBIC strips with at least thirty LEDs per metre and a 24 V supply for runs over three metres. RGBIC means the controller can address segments individually, so the backlighting can match complex color gradients from the screen without banding. If you prefer a more premium ecosystem, a Philips Hue Play gradient light strip paired with a Hue sync box offers excellent screen sync, while alternatives like Govee gradient bars or Hue Play light bars can replace strip lights entirely when your TV back design makes adhesive mounting difficult.
USB power, sync tricks, and when to skip strips for bars instead
Many budget kits for a TV backlight smart strip install rely on USB power from the TV, which sounds convenient but often underdelivers. A typical TV USB port is rated for 5 V at 0.5 A or 1 A, which is barely enough for a short USB LED strip at modest brightness. When you push longer LED strips or high brightness modes, the voltage sags, the lights flicker, and the screen sync effects become unreliable.
If you want stable smart light performance, use the dedicated power adapter supplied with the light strip and reserve the USB connection for data or simple on–off control. Some systems use a camera or a sync box placed near the screen to read colors and drive the backlighting in real time, which can be spectacular when tuned correctly. In those setups, keep the strip lights on a reliable mains adapter, then let the sync box or app handle color changes and scene transitions without worrying about power drops.
There are situations where the best TV backlight smart strip install is no strip at all, especially with very thin bezels or aggressively curved backs. In those cases, gradient bars like Govee light bars or Philips Hue Play bars placed a few centimetres behind the screen can create smooth bias lighting without any adhesive on the TV. If you are already building a broader smart lighting system with outdoor scenes and music sync, a product such as the Matter-compatible permanent outdoor wall lights reviewed on Smart Light Guru shows how robust power design and addressable LEDs translate into reliable performance indoors as well.
Bias lighting settings, eye comfort, and keeping the setup easy to live with
Once the physical TV backlight smart strip install is solid, the final step is tuning the light for comfort rather than spectacle. Bias lighting works best when the color temperature is close to neutral white, around the same tone as professional studio lighting, which keeps your eyes relaxed during long viewing sessions. If your smart light system supports presets, create one scene for accurate bias lighting and another for saturated party colors, then switch with the app or remote control instead of constantly tweaking sliders.
Properly tuned backlighting reduces eye strain by lowering the contrast between the bright screen and the dark room, which is especially helpful for late-night gaming or streaming. A stable halo of LED lights behind the screen lets your pupils stay at a more consistent size, so fast scene changes feel less harsh and the overall viewing experience becomes more immersive. When you combine that with a reliable TV backlight smart strip install, you get a setup that quietly works every evening instead of demanding constant troubleshooting.
For many people, the real test of any smart light or LED strip is how it feels at nine in the evening after a long day. The right light strips fade in with your TV, match the screen subtly, and then disappear from your awareness while you enjoy the content. If you respect the limits of the adhesive, manage heat, size the power supply correctly, and keep brightness reasonable, your backlighting will last for years instead of becoming yet another dead strip in the drawer.
FAQ
How bright should TV backlight strips be for comfortable viewing ?
For most people, setting the strip lights to around fifty to seventy percent brightness provides effective bias lighting without overpowering the screen. This level reduces eye strain in a dark room while preserving contrast and detail. Running LED strips at lower brightness also reduces heat buildup compared with constant full power use.
Is USB power enough for a TV backlight smart strip install ?
USB power from the TV can be enough for a short USB LED strip at modest brightness, but it often struggles with longer runs or high intensity effects. When the port cannot supply enough current, the LED lights may flicker, change color unexpectedly, or shut off. A dedicated power adapter matched to the LED strip rating is more reliable for everyday use.
What color temperature is best for bias lighting behind a TV ?
Neutral white in the range of about 4000 to 6500 kelvin is generally recommended for bias lighting behind a screen. This color temperature keeps whites on the display looking accurate and reduces visual fatigue during long viewing sessions. Very warm or very cool colors can be fun for effects but are less comfortable for regular watching.
Can I cut and rejoin LED strips to fit my TV exactly ?
Most LED strips can be cut at marked points, then rejoined with solder or clip-on connectors designed for that specific strip type. You must follow the manufacturer’s guidelines to avoid damaging the copper pads or reversing polarity. Planning the layout and cuts before powering anything helps ensure a clean, reliable TV backlight smart strip install.
Do I need a sync box for screen matching effects ?
A sync box or camera-based system is required if you want the backlighting to match on-screen colors in real time. Products like the Philips Hue sync box or similar devices from other brands read the video signal and translate it into dynamic color changes along the strip. If you only need static bias lighting, a simple smart light strip without screen sync is usually sufficient.